How to Use Webmail on the Microsoft Outlook App (IOS Version)

Steps to Download the Microsoft Outlook App
- Open the App Store on your device and search for “Outlook” to download and install the application, or download it directly from this link https://apps.apple.com/th/app/microsoft-outlook/id951937596?l=th
- Click the “Get” button to install the application.

Signing In
1. Once the installation is complete, open the Outlook app and tap “Add Account”

2. Sign in using your webmail account, for example: [email protected]
3. Then, click the “Add Account” button again to proceed to the next step.

4. Next, a window titled “Advanced Settings” will appear. Turn off the “Advanced Settings” option.

5. Once you’ve turned off the “Advanced Settings” feature, a new window will appear as shown.
6. Fill in all the required fields as follows
- Email Address: Your webmail address
- Password: Your webmail password
- Display Name: The name you want to appear when sending emails
- Description: (Optional) A label to help identify the account
7. After verifying that all the information is correct and complete, click the “Sign In” button to proceed.

Main Screen of the Outlook App on iOS
Once you’ve successfully signed in, the system will take you to the main Inbox screen, as shown in the example. To compose a new email, tap the
“New Message” button to start writing and sending a message to the recipient.

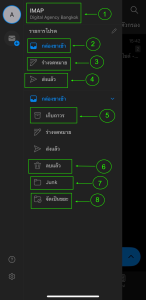
Efficient Email Management
-
- IMAP - Digital Agency Bangkok: Displays the email account currently in use, connected via the IMAP protocol for two-way synchronization.
- Inbox: Contains all received emails.
- Drafts: Stores draft emails that are being written but not yet sent.
- Sent: Stores emails that have already been sent.
- Archive: Used to store emails that you don't want to delete but prefer not to keep in the Inbox.
- Deleted: Displays emails that have been deleted.
- Junk Mail: A folder for junk or spam emails.
- Trash/Spam: Additional folders for filtering out unwanted or spam emails.